从开发到实施XD
因为公司一个小项目要求有负载和热备,于是翻了很多网上的教程,于是找到了这一篇blog,很感谢博客的作者MassiveStars,这篇博客也使我学到了不少关于nginx配置的知识,毕竟以前连nginx都没有碰过XD。本博客大部分内容可能和作者的博客内容雷同,毕竟只是作为笔记存在的东西,侵删。
配置虚拟IP
互为主从模式
互为主从模式需要配置两个vip(虚拟ip)进行负载,因此是需要负载均衡支持的哟~
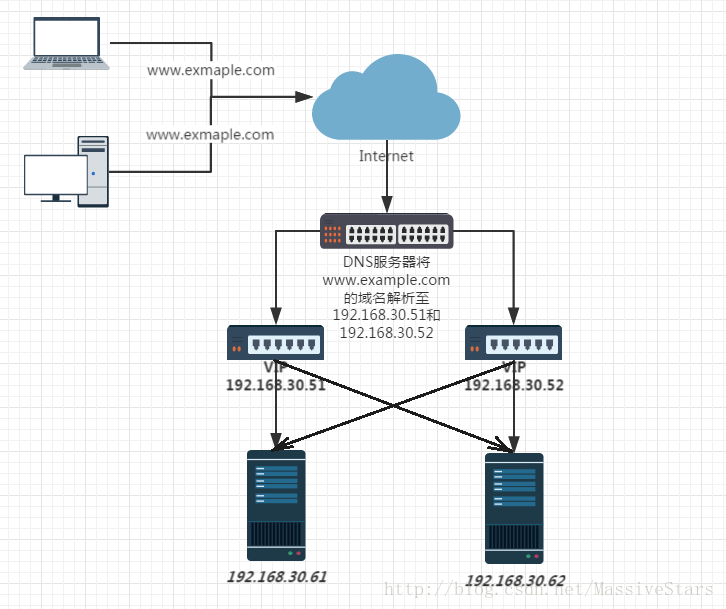
主从模式
即一个服务器为主(master),一个服务器为从(slave),在使用的时候,如果主异常则切换到从服务器,若主服务器恢复,则切回主服务器
PS:这种模式的弊端就是,当由从向主切换的时候,如果从服务器正在执行操作,可能会产生错误~
配置方法
ifconfig eth0:0 192.168.40.151 netmask 255.255.255.0 up
eth0: 用ifconfig命令查到的正在使用的网络设备名称,虚拟ip的命名必须采用此规则,建立在某一网络设备下
配置nginx
安装nginx
PS:我用的是ubuntu和opensuse,centos应该类似,建议上网把包down下来编译安装,这样更靠谱一些,当然,用yum安装也没有问题,方法类似
#安装nginx
leejoker@ubuntu:~$ sudo apt-get install nginx
配置nginx服务
#接下来是配置nginx
leejoker@ubuntu:~$ sudo vim /etc/nginx/nginx.conf

#PS:这里说明一下,不同的发行版,默认配置可能不同,我是现将默认配置进行了备份,然后重新写了一份,贴上自己的当前配置

#user  nobody;
worker_processes  1;

#error_log  logs/error.log;
#error_log  logs/error.log  notice;
#error_log  logs/error.log  info;

#pid        logs/nginx.pid;


events {
    worker_connections  1024;
}


http {
    include       mime.types;
    default_type  application/octet-stream;

    #log_format  main  '$remote_addr - $remote_user [$time_local] "$request" '
    #                  '$status $body_bytes_sent "$http_referer" '
    #                  '"$http_user_agent" "$http_x_forwarded_for"';

    #access_log  logs/access.log  main;

    sendfile        on;
    #tcp_nopush     on;

    #keepalive_timeout  0;
    keepalive_timeout  65;

    #gzip  on;

    server {
        listen          8080;               #本地端口
        server_name     192.168.40.151;     #本地域名
        location / {                        #代理配置
            proxy_pass          http://192.168.17.71:7003;
            proxy_redirect      off;
            proxy_set_header    X-Real-IP       $remote_addr;
            proxy_set_header    X-Forwarded-For $proxy_add_x_forwarded_for;
        }

        #charset koi8-r;

        #access_log  logs/host.access.log  main;

        #error_page  404              /404.html;

        # redirect server error pages to the static page /50x.html
        #
        error_page   500 502 503 504  /50x.html;
        location = /50x.html {
            root   html;
        }

        # proxy the PHP scripts to Apache listening on 127.0.0.1:80
        #
        #location ~ \.php$ {
        #    proxy_pass   http://127.0.0.1;
        #}

        # pass the PHP scripts to FastCGI server listening on 127.0.0.1:9000
        #
        #location ~ \.php$ {
        #    root           html;
        #    fastcgi_pass   127.0.0.1:9000;
        #    fastcgi_index  index.php;
        #    fastcgi_param  SCRIPT_FILENAME  /scripts$fastcgi_script_name;
        #    include        fastcgi_params;
        #}

        # deny access to .htaccess files, if Apache's document root
        # concurs with nginx's one
        #
        #location ~ /\.ht {
        #    deny  all;
        #}
    }


    # another virtual host using mix of IP-, name-, and port-based configuration
    #
    #server {
    #    listen       8000;
    #    listen       somename:8080;
    #    server_name  somename  alias  another.alias;

    #    location / {
    #        root   html;
    #        index  index.html index.htm;
    #    }
    #}


    # HTTPS server
    #
    #server {
    #    listen       443 ssl;
    #    server_name  localhost;

    #    ssl_certificate      cert.pem;
    #    ssl_certificate_key  cert.key;

    #    ssl_session_cache    shared:SSL:1m;
    #    ssl_session_timeout  5m;

    #    ssl_ciphers  HIGH:!aNULL:!MD5;
    #    ssl_prefer_server_ciphers  on;

    #    location / {
    #        root   html;
    #        index  index.html index.htm;
    #    }
    #}

}
基本上这样就配置完了,本地域名(一般为dns可以解析的域名,自己测试的时候使用的ip)。
启动nginx
#启动nginx
leejoker@ubuntu:~$ sudo nginx
配置keepalived
安装keepalived
#安装keepalived
leejoker@ubuntu:~$ sudo apt-get install keepalived
配置keepalived
先来个图
这是第一台机器的配置
创建配置文件:sudo vim /etc/keepalived/keepalived.conf
global_defs
{
    notification_email
    {
       1056650571@qq.com
    }
    notification_email_from 1056650571@qq.com
    smtp_server 127.0.0.1
    stmp_connect_timeout 30
    router_id LVS_DEVEL
}

vrrp_script Monitor_Nginx {
    script "/usr/local/keepalived/scripts/monitor_nginx.sh"
    interval 2
    weight 2
}

# 虚拟IP1, 本机作为Master
vrrp_instance VI_1 {
    state MASTER
    interface ens33             #这里就是图上的那个,你的配置文件中用到的网络设备全部写这个
    virtual_router_id 151
    priority 100
    advert_int 1
    track_interface {
        ens33
    }

    authentication {    #这个是两个keepalived之间通信的凭证
        auth_type PASS
        auth_pass 123456
    }
    virtual_ipaddress {
        192.168.40.151      #这里填写本机配置的虚拟ip
    }
    track_script {
        Monitor_Nginx
    }

}

# 虚拟IP2, 本机作为Backup
vrrp_instance VI_2 {
    state BACKUP
    interface ens33         #这里是本机作为backup时用到的网络设备
    virtual_router_id 152
    priority 100
    advert_int 1
    track_interface {
        ens33
    }

    authentication {
        auth_type PASS
        auth_pass 123456
    }
    virtual_ipaddress {
        192.168.40.152      #这里是本机作为backup时的虚拟ip
    }
    track_script {
        Monitor_Nginx
    }

}
第二台的配置
global_defs
{
    notification_email
    {
       123456@qq.com
    }
    notification_email_from 123456@qq.com
    smtp_server 127.0.0.1
    stmp_connect_timeout 30
    router_id LVS_DEVEL
}

vrrp_script Monitor_Nginx {
    script "/usr/local/keepalived/scripts/monitor_nginx.sh"
    interval 2
    weight 2
}

# 虚拟IP1, 本机作为BACKUP
vrrp_instance VI_1 {
    state BACKUP
    interface eth0
    virtual_router_id 151
    priority 100
    advert_int 1
    track_interface {
        eth0
    }

    authentication {
        auth_type PASS
        auth_pass 123456
    }
    virtual_ipaddress {
        192.168.40.151
    }
    track_script {
        Monitor_Nginx
    }
}

# 虚拟IP2, 本机作为Master
vrrp_instance VI_2 {
    state MASTER
    interface eth0
    virtual_router_id 152
    priority 100
    advert_int 1
    track_interface {
        eth0
    }

    authentication {
        auth_type PASS
        auth_pass 123456
    }
    virtual_ipaddress {
        192.168.40.152
    }
    track_script {
        Monitor_Nginx
    }

}
配置的内容类似,只不过网络设备上有些差异,就不多说了。
启动keepalived
sudo /usr/sbin/keepalived -f /etc/keepalived/keepalived.conf
PS:声明一下,关于keepalived的日志网上大多都是说在/var/log/messages下,不过我今天使用的发行版,日志都是和系统日志混在一起的,所以查阅日志的话请自行百度。
PS:补上我的日志文件路径:/var/log/syslog (ubuntu) 和 jounalctl (opensuse)
最后补上nginx监控脚本
# 监控nginx进程,若nginx主进程不存在则启动nginx
# 若5s后nginx进程还是不存在的话kill掉keepalived进程,防止nginx没运行该主机的keepalived还接管虚拟IP
#!/bin/bash
if [ "$(ps -ef | grep "nginx: master process"| grep -v grep )" == "" ]
        then
        /usr/sbin/nginx # 路径请以实际安装路径为准
        sleep 5
        if [ "$(ps -ef | grep "nginx: master process"| grep -v grep )" == "" ]
        then
                  killall keepalived
        fi
fi
总结
按照上面这样配置基本上就完成了互为主从模式的配置,单纯主从模式只是去掉其中的一部分配置,具体可以百度进行参考,就不在这里赘述了。